Experimental thermomechanics

Material characterisation of metallic materials under thermal and mechanical loads at temperatures from -180 °C to over 1000 °C

© Fraunhofer IWM
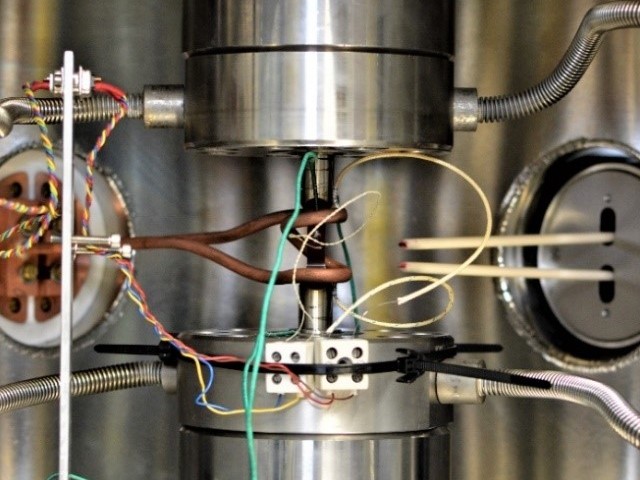
High temperature crack propagation measurement under high vacuum.

Regardless of whether the component design is carried out according to the safe life method or is subject to damage tolerance, for both design philosophies, corresponding material parameters under operational loads are of major importance.

In order to fulfil this mission, the »Experimental Thermomechanics« team has an extensive range of testing machines with state-of-the-art experimental technology and a profound expert knowledge in the field of high-temperature testing of metallic materials under thermal and mechanical loads at temperatures up to over 1000 °C.

The focus here is on static tests such as tensile and creep tests or low-cycle (LCF), high-cycle (HCF) and nonisothermal (TMF) fatigue tests. By superimposing LCF/HCF and TMF/HCF loading, for example, high-cycle combustion processes can be simulated. The use of hydrogen as an alternative gas turbine fuel in future low-emission power generation will result in a significant change in the thermal stresses of gas turbine components, e.g. the combustion chamber. The operational behaviour of the materials can be tested, for example, by iso- and nonisothermal crack propagation measurements - also under inert gas atmosphere or high vacuum.

For very special applications, customised test rigs for component-near specimens can be realised according to customer requirements.

Services

  • Material characterisation of metallic materials under thermal and mechanical loads at temperatures from -180 °C to over 1000 °C. This includes in particular (C)LCF, TMF, superimposed LCF/HCF and TMF/HCF tests, high-cycle thermal shock tests also with superimposed low-cycle fatigue loading and creep fatigue tests.
  • Performance of crack propagation tests under isothermal and nonisothermal conditions using an alternating current potential system and/or optical methods, short crack growth measurements based on the replica technique.
  • Performance of hot tensile, SSRT and compression tests, relaxation tests and (short-term) creep tests
  • Conceptual design, construction, computational design and conduction of special purpose test setups and component-like test specimens.
  • Possibility of carrying out tests under inert gas or high vacuum.

to top

Quantification of the environmental influence on high-temperature fatigue

To clarify and quantify the effect of the ambient atmosphere and its influence on the damage behaviour, a test setup with a vacuum chamber was developed at the Fraunhofer IWM. It allows to perform all high-temperature tests for the qualification of materials for high-temperature components, such as LCF, TMF, HCF or crack growth tests, under high vacuum (up to 1E-9 bar). Optionally, the chamber can also be flushed with various inert gases.

The test setup was designed for the special requirements of high-temperature fatigue at the Fraunhofer IWM and manufactured with the help of external partners. The heart of the system is the test chamber, which is double-walled and thus enables internal water cooling. The vacuum is initially generated by means of a rotary vane pump; the high vacuum is achieved by switching on a powerful turbomolecular pump. Suitable feedthroughs allow the measurement signals of the sensors to be led out of the chamber. The mechanical load is applied by a servo-hydraulic universal testing machine from Instron. A high-frequency induction system is used for heating, with which temperatures above 1000 °C can be reached. For crack propagation measurements, the crack extension can be detected with the help of an AC potential drop system. In order to gain further insights into the damage behaviour of the material and the local deformation by means of digital image correlation, a high-resolution measuring camera is to be installed inside the test chamber in the future.

to top

Thermomechanical fatigue with superimposed thermal loading

Numerous high-temperature components are subject to a complex thermal and mechanical load during operation, whereby the mechanical load is wholly or partly due to thermally induced stresses because of an inhomogeneous temperature distribution in the component. If high temperature gradients occur very locally on the component surface, e.g. as a result of a flowing water vapour medium, this is referred to as thermal fatigue (TF) or »thermal shock stress«. This often leads to a large number of small incipient cracks in the volume area near the surface without any recognisable orientation to the loading direction or as a random crack network, which is often also referred to as »elephant skin«.

To quantitatively determine the influence of TF loading on service life, a test rig was developed with which superimposed thermomechanical (TMF) and thermal (TF) fatigue loading can be applied to laboratory specimens for the first time. Investigations on typical power plant materials showed a (partly significant) reduction of the total service life due to TF superposition. The fractographic investigations showed a similar character to the damage pattern of real components, so that it can be assumed that the damage mechanism can be simulated realistically.

to top

Fast, non-contact strain measurement method for thermally and mechanically highly stressed materials

Materials for lightweight construction and high-temperature applications must first be qualified by means of fatigue tests before they can be used optimally. Classically, low cycle fatigue tests are carried out in strain control mode, for which a tactile strain transducer is placed on the sample surface. In the case of very ductile materials, for example an aluminium piston alloy at 380 °C, the application of the strain transducer can already lead to preliminary damage of the specimen and thus also to a falsified measurement result.

With a new optical strain measurement system developed in collaboration with Fraunhofer IPM, the specimen strain can be measured without contact and, in particular, can also be controlled without the use of conventional, contacting measurement systems leading to unwanted damage to the test specimen. The new optical measuring system uses fast, modern image processing technologies for the first time to combine the advantages of tactile and optical extensometers: Fast, high-resolution cameras reliably detect surface structures even on polished samples and use these as natural markers in image processing. This eliminates the need for time-consuming sample preparation to apply artificial markers.

Thanks to parallelised image evaluation on graphics cards, the strain can be measured without contact with a rate of more than 1000 Hz - previously, only measurement rates of up to 100 Hz were possible with optical systems. The measurement accuracy of the new Fraunhofer strain measurement system corresponds to class 0.5 according to DIN ISO 9513. The size of the image field can be adapted to the test task, so that the real-time evaluation also allows strain-controlled tests in the micro and macro range. The optical measuring system also offers the possibility of further image-processing analyses. For example, the damage development could be analysed in real time or in the follow-up. This provides project partners with more precise measurement data for even more accurate predictions of component service life.

to top

Publications

  • Garcia Trelles, E.; Eckmann, S.; Schweizer, C., Experimental characterization of the short crack growth behavior of a ductile cast iron (DCI GJS-500) affected by intergranular embrittlement at temperatures nearby 400 °C, International Journal of Fatigue 155 (2022) Art. 106573, 13 Seiten Link
  • Blug, A.; Regina, D.J.; Eckmann, S.; Senn, M.; Bertz, A.; Carl, D.; Eberl, C., Real-time GPU-based digital image correlation sensor for marker-free strain-controlled fatigue testing, Applied Sciences 9/10 (2019) Artikel-Nr. 2025, 15 Seiten Link
  • Blug, A.; Regina, D. J.; Eckmann, S.; Senn, M.; Eberl, C.; Bertz, A.; Carl, D., GPU-based digital image correlation system for real-time strain-controlled fatigue and strain field measurement, Proceedings of SPIE Volume 11056, Optical Measurement Systems for Industrial Inspection XI; Lehmann, P. (Hrsg.); Society of Photo-Optical Instrumentation Engineers (SPIE), Bellingham, WA, USA (2019) 110560V 1-10 Link
  • Eckmann, S.; Schweizer, C.; Characterization of fatigue crack growth, damage mechanisms and damage evolution of the nickel-based superalloys MAR-M247 CC (HIP) and CM-247 LC under thermomechanical fatigue loading using in situ optical microscopy; International Journal of Fatigue 99/Part 2 (2017) 235-241 Link
  • Schlesinger, M.; Schweizer, C.; Brontfeyn, Y.; Influences on the thermomechanical fatigue crack growth of the nickel alloy 617; Materials Testing 57/2 (2015) 131-135 Link
  • Metzger, M.; Seifert, T.; A mechanism-based model for LCF/HCF and TMF/HCF life prediction: multiaxial formulation, finite-element implementation and application to cast iron; Technische Mechanik 32/2-5 (2012) 435-445 Link

to top